

")
Looking for activities to bring a little warmth to your classroom this winter? School is the perfect time to nurture the inner artist that lives inside every child. What better way than to teach kids how to draw something fun and seasonal? Get a free printable with step-by-step instructions to teach kids 3 different ways to draw a snowman and bring your own Olaf and Frosty to life. Use it as a fun Friday group activity or keep it on hand for those who finish early.
We have video tutorials and images to guide you step by step. Plus, be sure to download the free printable instructions to make it easy for kids to understand.
How to draw a snowman video
Here are four easy-to-follow steps to teach kids how to draw a snowman in three different ways. We need to simplify the process for children of all ages and abilities.
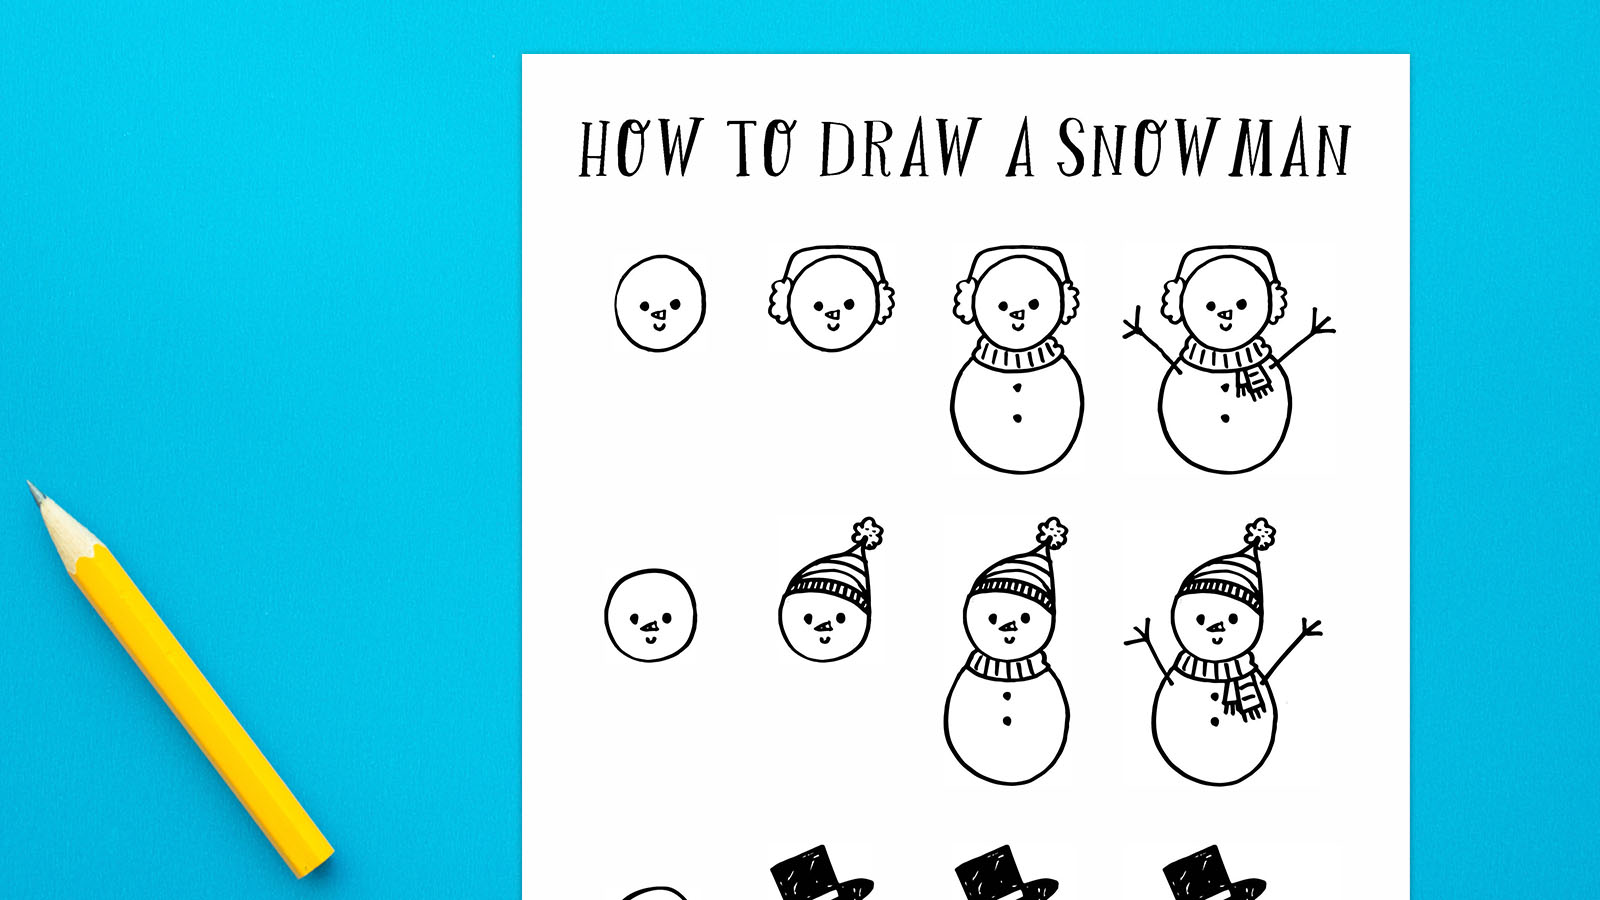
How to draw a snowman step by step (version 1)
we are teachers
Step 1
First, draw a small circle towards the top of the page. About halfway around the circle, draw and shade two small dots for the snowman’s eyes. Once the eyes are complete, draw a small horizontal triangle that will serve as the snowman’s carrot nose. Finally, add a small U shape for the mouth.
we are teachers
Step 2
Next, give the snowman some cute little earmuffs. Draw a wavy earmuff on the left side of the snowman’s head, and repeat on the other side. Next, draw a line that goes up on the snowman’s head and connects the two sides of the earmuffs.
we are teachers
Step 3
Add the snowman’s body. First, give them a scarf to keep warm. Starting at the bottom left of the head, draw a small wavy line and connect it to the bottom right of the head. Add some vertical lines to the inside of the scarf for texture/pattern. Starting from the left side of the scarf, draw an oval shape for the snowman’s body. It should be about twice the size of your head. Finally, add two small dots in the center for the buttons.
we are teachers
Step 4
Every snowman needs a weapon! Draw diagonal lines from the top outwards from both sides of the snowman’s body. Next, add three short lines coming out of each arm. Your fingers should start at the base of the snowman’s earmuffs. Next, finish the scarf by taking two small blocks from the bottom right corner of the scarf. The smaller ones are meant to show depth and appear behind the larger ones. Finally, add some fringe to the base of the scarf and a few horizontal lines to the large blocks.
How to draw a snowman step by step (version 2)
we are teachers
Step 1
First, draw a small circle towards the top of the page. About halfway around the circle, draw and shade two small dots for the snowman’s eyes. Once the eyes are complete, draw a small horizontal triangle that will serve as the snowman’s carrot nose. Finally, add a small U shape for the mouth.
we are teachers
Step 2
Inside the top of the snowman’s head, draw a thin strip that will become the bottom of the winter hat. Next, create a swirling triangular shape that leans to the right and culminates in a point. Add a few horizontal lines from one side of the hat to the other. Finally, add a cute pompom to the top.
we are teachers
Step 3
Add the snowman’s body. First, give them a scarf to keep warm. Starting at the bottom left of the head, draw a small wavy line and connect it to the bottom right of the head. Add some vertical lines to the inside of the scarf for texture/pattern. Starting from the left side of the scarf, draw an oval shape for the snowman’s body. It should be about twice the size of your head. Finally, add two small dots in the center for the button.
we are teachers
Step 4
Every snowman needs a weapon! Draw diagonal lines from the top outwards from both sides of the snowman’s body. Next, add three short lines coming out of each arm. Your fingers should end at the base of the snowman’s hat. Next, finish the scarf by taking two small blocks from the bottom right corner of the scarf. The smaller ones are meant to show depth and appear behind the larger ones. Finally, add some fringe to the base of the scarf and a few horizontal lines to the large block.
How to draw a snowman step by step (version 3)
we are teachers
Step 1
First, draw a small circle towards the top of the page. About halfway around the circle, draw and shade two small dots for the snowman’s eyes. Once the eyes are complete, draw a small horizontal triangle that will serve as the snowman’s carrot nose. Finally, add a small U shape for the mouth.
we are teachers
Step 2
After drawing the head, draw an oval tilted to the left that will be the beginning of the snowman’s top hat. It should overlap the top of your head. Next, draw a rectangle that slightly overlaps inside the tilted overlap. This creates a small horizontal rectangle. Shade everything except this little rectangle.
we are teachers
Step 3
Add the snowman’s body. First, give them a scarf to keep warm. Starting at the bottom left of the head, draw a small wavy line and connect it to the bottom right of the head. Add some vertical lines to the inside of the scarf for texture/pattern. Starting from the left side of the scarf, draw an oval shape for the body of the snowman. It should be about twice the size of your head. Finally, add two small dots in the center for the button.
we are teachers
Step 4
Every snowman needs a weapon! Draw diagonal lines from the top outwards from both sides of the snowman’s body. Next, add three short lines coming out of each arm. The left finger should start directly below the base of the snowman’s hat. Next, finish the scarf by taking two small blocks from the bottom right corner of the scarf. The smaller ones are meant to show depth and appear behind the larger ones. Finally, add some fringe to the base of the scarf and a few horizontal lines to the large block.
Get a free printable with step-by-step instructions on how to draw a snowman.
Are you ready to save and print your free snowman drawing? Simply click the button below and fill out the form on this page.