

")
Want activities to appeal to all animal lovers in your classroom? Elementary school is the perfect time to raise an inner artist who lives in all children! Our free printables have step-by-step instructions to teach children how to draw giraffes. Make it a fun Friday group activity or keep it handy for a fast finisher.
There is a video tutorial and image with step-by-step instructions. Plus, make sure to download free printable instructions so that your kids can follow easily.
How to draw a giraffe video
How to draw a giraffe step by step
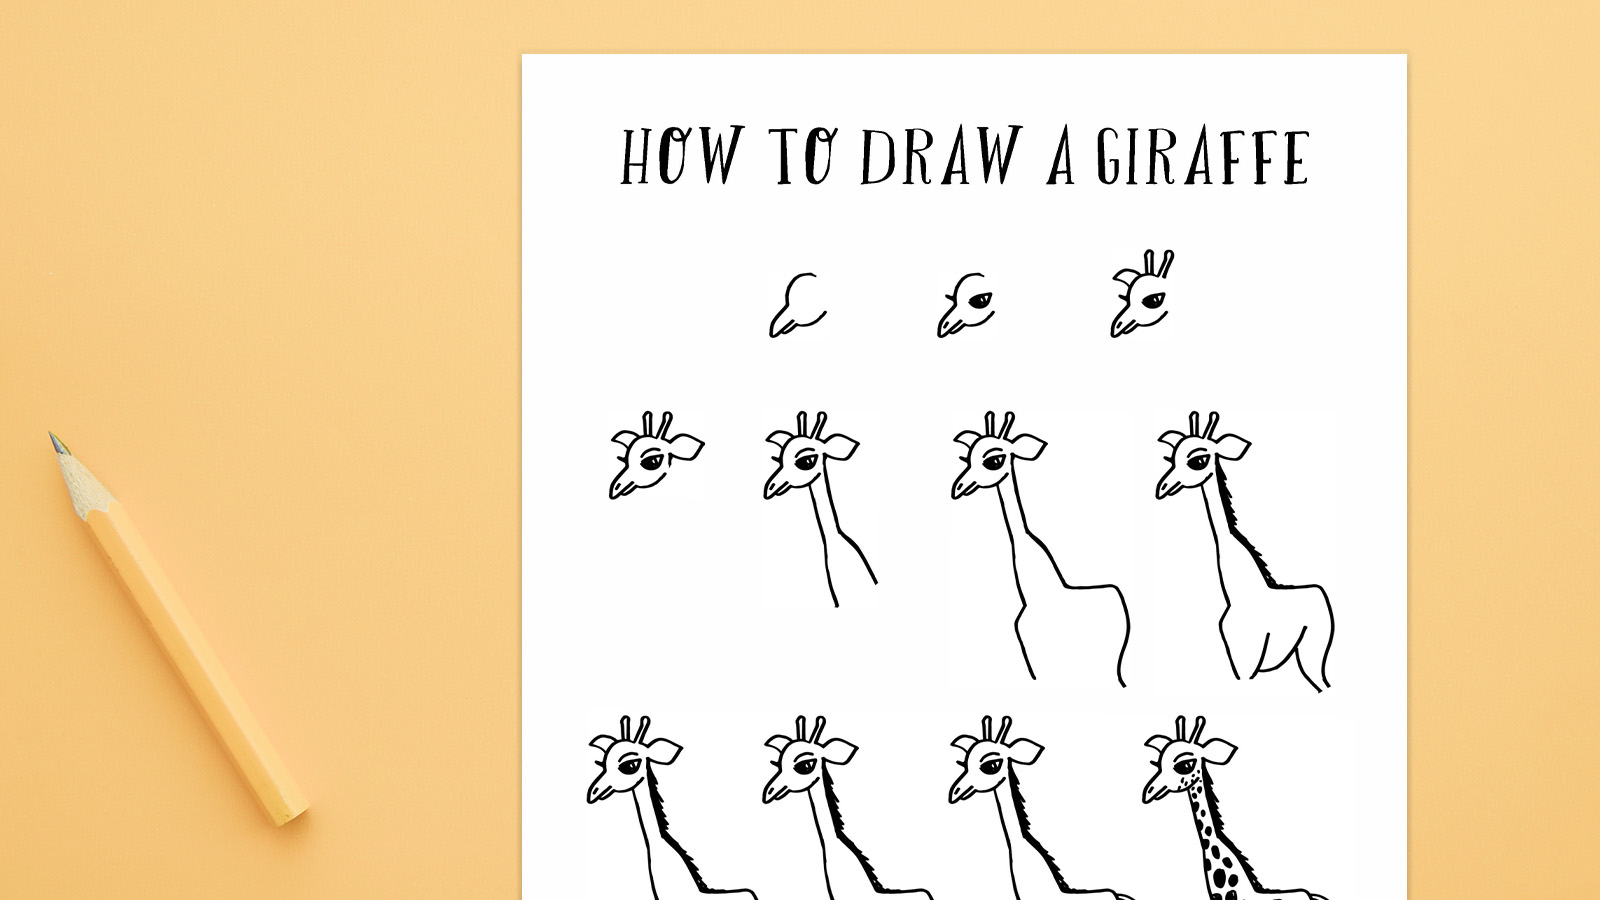
Here are 11 easy-to-understand steps to teach children how to draw giraffes. They need to simplify the process for children of all ages and abilities.
We are teachers
Step 1
When you’re ready to learn how to draw a giraffe, set up a white drawing and a permanent black marker. Start by forming the contours of Giraffe’s head. Draw a semicircle that reaches its peak towards the center of the top of the paper, into a lip-like shape with a small lip below. Next, proceed up the half circle.
We are teachers
Step 2
In this second step of how to draw a giraffe, we’ll add some details. Draw a small line inside your beak-like nose. Draw eyelashes that stretch out from the top half of your face. I would also like to add an oval eye mostly covered.
We are teachers
Step 3
Now it’s time to add some more details to our giraffe friends’ heads! Add the ears just above the eyelashes you drew in the previous step. Next, draw two horn-like shapes at the top of your head. Fun Vocabulary Lessons: These horn-like parts are actually called male cones!
We are teachers
Step 4
Are you still enjoying learning how to draw giraffes? That’s certainly true! After the second male cone that connects to the big ear, draw a very small line and finish the head. The painted front ear is intended to be in the background while the ears drawn in this step are at the forefront and therefore grow larger. Finally, add a small vertical line below the ear, leaving a very small space between it and the bottom of the giraffe’s head.
We are teachers
Step 5
We can’t clearly forget the long, beautiful neck, which is a very distinct feature of the giraffe. Arrange the beginning on the left side of your neck under your eyes. Start drawing lines under your face and make sure to give it a slightly longer length! Start the right side of your neck directly below the front line ear. I hope it’s slightly shorter than the other side of my neck. Finally, add the top of your body from both ends of your neck. The right side is slightly tortuous, while the left side is straight with a slight curve.
We are teachers
Step 6
Now it’s ready to be added to the giraffe’s body. On the left, add a small bumpout to the vertical line pointing to the inside. To the right, add a short horizontal line that goes downwards and eventually forms a C-shaped shape.
We are teachers
Step 7
Now we are ready to begin to form the legs. Create a kind of right-leaning V-shaped in the middle of our giraffe’s body, so that our feet begin to form. Also ready to add the giraffe head and back fur. Shade the fur in black with a zigzag pattern.
We are teachers
Step 8
You can’t learn how to draw a giraffe without learning how to draw long and elegant feet! We draw the front legs that come out of the body we have already drawn. Place your round kneecap in the center and draw the top of your feet. Once the knees are drawn, draw the bottom of the legs and end with diagonal lines on each side towards the left. Finally, add a shadowed triangular hoove.
We are teachers
Step 9
Let’s add a few more feet! Add one back leg. Draw a curve that emerges from the V-shaped shape formed in the first half in the center of the body. Next, draw a straight, thin leg that ends just like the front leg. This is two short, inclined lines with triangular hooves. The back leg at the front is removed from the left side of the body part of the leg already depicted. Repeat the same shape as you already use for the front leg at the front.
We are teachers
Step 10
Our giraffe friends definitely need a tail! Add a thin tail from the top of the back of the body. Next, draw a bunch of fur at the base of the tail to shade it. You’ll also want to draw that last leg. Draw a curve that appears from the V-shaped center that changes to the center. It mimics the same shape as everything else on the lower half of the foot. Don’t forget that cute little hoove!
We are teachers
Step 11
For the fun part! You can definitely add some personality to your giraffes with the size and arrangement of their spots!
Make your free Giraffe Drawing printable!
We are teachers
Are you ready to save and print your free Giraffe Drawing? All you need to do is click the button below and fill out the form on this page.